Crib Hut Heritage Conservation Project
The team at AMS Instrumentation & Control Ltd all have the option to take a week’s additional paid leave to do charity work if required, so when the opportunity arose to volunteer with the Cornwall Heritage Trust to conserve an internationally important piece of mining heritage close to where I live I immediately signed up to help.
The Location
The project is a Crib Hut located in the Luxulyan Valley in mid Cornwall, which is part of the Cornwall & West Devon Mining Landscape World Heritage Site due to the abundance of early 19th century industrial remains throughout the area. Most notable of these is the Treffry Viaduct; completed in 1842, this viaduct was built by Joseph Treffry as part of his network of tracks for horse-drawn trams to link Par harbour to the mines at Bugle and then eventually to Newquay harbour. The viaduct also carried water from higher ground to operate a 34ft diameter water wheel connected to a winding cable to pull trams up the nearby Carmears Incline. The Treffry Viaduct is the only known viaduct in Britain to combine these two uses. The whole valley is a web of tramways and waterways from this industrial era – more information can be found here.

Treffry Viaduct
The Crib Hut is situated adjacent to the viaduct. From a nearby remaining piece of tram track it can be seen that there was a siding, and the large amount of dressed granite laying in a semi-circular formation next to the hut makes us think that there must have been a crane located here to offload and re-load the trams.
The Crib Hut
A crib hut is a place for the workers to shelter whilst eating their “crib” or lunch.
This crib hut is a simple structure of granite blocks held together with a basic earth mortar, with a door, one window and a fireplace. The lintels above the window and fireplace are made from pieces of track. No evidence was found of a roof, eg. slate or wood, so it might be that the building was roofed with a sheet of tin which was taken for use elsewhere once the hut was no longer in use. It is possible that the building was erected with little advance planning using the raw materials found in the immediate vicinity.
When industrial work within the Luxulyan Valley ceased nature was quick to reclaim the landscape. I walk past this site regularly but until a few years ago I had no idea that this building was here. The undergrowth was cleared but trees had already done much damage, growing through the granite walls and threatening to turn the whole structure in to a pile of rubble.
Cornwall Heritage Trust sent out an appeal for funds for the conservation of the hut, and as soon as a window of opportunity opened up for the work to be carried out, volunteers were sought to help.

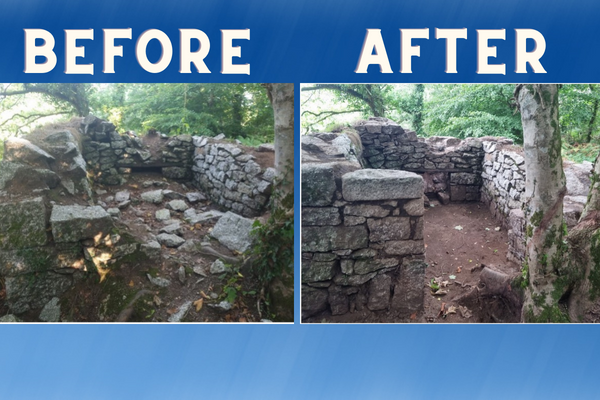
Prior to conservation work
The aim of the project
Cornwall Heritage Trust’s goal is to clear the area around the site, remove all the invasive foliage and vegetation, secure the structure and soft cap the outer wall. The clearance would enable us to learn more about the structure and give visitors a better indication of how it would have looked in the 19th Century, as well as to consolidate it to preserve it for the future. This was to be done over a period of three weeks with a team of volunteers under the expert guidance and tutelage of Charlie and Rachel from Old Light Building Conservation, a local company specialising in ruin consolidation and traditional lime pointing (more about that later!) amongst other things.

After week one
Week 2
I joined the volunteer team on week 2 of the project. As you can see from the pictures, a lot of work had already been done during week 1 retrieving the fallen granite blocks from inside the hut and digging out the remaining earth to expose the floor level. A cheeky sycamore that had grown through the fireplace was removed, and one enormous granite block was retrieved from where another sycamore had grown around it with the help of a chainsaw and a pulley system. Fallen quoin stones were retrieved and put aside for the rebuilding and part of the wall around the door had already been rebuilt.
Upon my arrival at the beginning of week 2, Charlie and Rachel were ready to start strengthening the blocks within the walls with lime mortar, before pointing the walls using an earth mix. The lime mortar would provide structural stability, but the much more visible element of pointing would contain only the bare minimum of lime in keeping with the historical integrity of the building.
You can’t mix Lime in the Rain
Unfortunately, on that August morning during the driest summer since 1974, it was raining. And for some long-forgotten reason I had decided to walk to site, around 45 minutes, uphill, during which time the rain got heavier and heavier. Arriving on site my car-less state meant that Rachel and Charlie felt obliged to leave the dry comfort of their vintage Landrover (which was too full of building paraphernalia to squeeze me in) and while Rachel talked me through the project Charlie put up a makeshift shelter.

Day One – Rain!
It was an interesting and informative morning for me but unfortunately not very productive for the team as very wet conditions and a saturated wall make it impossible to apply lime successfully. I did learn that unslaked lime mixed with water could cause an exothermic reaction, however the hydraulic lime that we were using is an end-product that has already gone through the slaking process, so no danger of this happening for us! It will however cause irritation if inhaled or if it makes contact with your eyes, so safety goggles and masks were handed out together with guidance on the safest way to handle the lime powder.
After the Rain
Later that day, after the rain had cleared, I met up with another volunteer, Gareth (who had also helped with all the hard work of the previous week) and we set to making the lime mortar for the hidden strengthening work. We were building using a mix of 4 parts sand, 1 part earth and 2 parts lime, mixed with water to the correct consistency. The earth was taken from site, essentially re-using the original mortar from the building, the sand was selected to be the optimal colour and texture for the job, and the lime was natural hydraulic lime 2, offering similar physical characteristics to cement but with all the virtues of lime. It is a low strength lime, high strength not being necessary for a building originally held together with earth. The ratio was decided upon by Charlie and Rachel and will vary with each project according to a variety of factors such as the age of the building, the porosity of the stone, relative exposure to the elements, and many years’ experience.

Making Lime Mortar
Lime
The use of lime in building conservation has increased over recent years and is essential to their structural welfare. A lot of knowledge about lime was lost following the introduction of Ordinary Portland Cement and investment in the cement industry in the 1930s, and while cement is a fantastic material for contemporary construction, its use in historic buildings creates problems.
Traditionally constructed buildings use materials such as stone, brick, or cob, in conjunction with lime mortars and renders. The soft and permeable qualities of lime mortar allow for any movement in the structure and ensure that moisture in the walls can freely evaporate. Because lime mortar is generally softer than stone occasional repointing is necessary.
A historic stone building repointed with a hard cement mortar causes damage over time. The softness of the stone relative to the hardness of the cement means that moisture within the structure is forced to escape through the masonry surface, rather than the mortar joints. The erosion of the building blocks by the elements is rapidly accelerated, whereas it is the mortar that should be the sacrificial element in a building as it can be readily replace by repointing.

The Salt Cellar in Porthleven, indicating the damage caused by repointing an old building in hard cement mortar. Photograph courtesy of Old Light Building Conservation.
The Fireplace
Much of the site clearance had been done during the previous week, however while I was there more of the fireplace was unearthed and it was found to have a distinct skew to the right, as well as an unexplained cavity in the chimney. With the small window being to the left of the fireplace, overlooking the valley, and the door also being left of centre, this raised the possibility that maybe this building wasn’t a crib hut for the workers, but rather a shelter for one worker – who would sit to the right of the fire where the greatest warmth would be – between supervising the rock and minerals being loaded and offloaded at this site. It is possible that we will never know for sure.

Fireplace
The Conservation Process
During the week I tried my hand at a variety of tasks, but to be honest I was most comfortable playing with the cement mixer (until I flooded the petrol engine on day four, but we won’t deliberate on that!)
As different parts of the hut were at different stages during the week I’ll summarise the process chronologically based on information gleaned from the team at Old Light Building Conservation.
After the initial site clearance the joints are prepared. As the hut was originally built with a simple earth and water mortar this involved raking out the earth from between the blocks, moving the smaller stones where necessary. The walls were all photographed prior to the start of work so that any large stones could be replaced in their original positions. This sounds like it should be a straightforward process, but on this building sometimes there was more earth than stone, and raking out too thoroughly would result in destabilisation of the structure. Where a big gap was unearthed, or where larger stones were removed, these were replaced using the lime mortar to secure them.
Once the joints are prepared, gallet stones, or pinning stones, are inserted into any gaps to support the masonry and reduce the mortar mass. These are secured with a flick of lime mortar towards the back, to increase stability without being visible, and the stones fit in any way possible, either flush with the face of the wall or, in the case of smaller gallets, depressed ready to be covered with the earth pointing.

Inserting the gallet stones

A section of wall in progress. The upper parts have already been pointed but not tamped. The lower parts have been raked out ready for the insertion of gallet stones.
Pointing
For the pointing a mix of 10 parts earth and 1 part lime was used, mixed to a workable consistency. If the mortar is too wet it requires more care to apply cleanly and may be prone to shrinkage and cracking. The use of a predominantly earth based mortar for pointing is in keeping with the original fabrication of the building, but with a small amount of lime added for strength.
Once the mortar has just started to set it is tamped with a churn brush to compact it within the joint and leave a textured, more natural looking surface.
Returning to Nature
The final part of this project, which is to be carried out later this year, is to add a soft cap to the tops of the walls. This is a turf parcel, preferably made from turf dug up in the vicinity, which will be covered in biodegradable jute for protection while the turf roots, and which will serve to protect the building in the absence of a roof.
A friend who was on the initial work party to clear the undergrowth from the Crib Hut a few years ago said that it was mentioned at the time that maybe the undergrowth was holding the building together! With the consolidation work done over these two weeks and the addition of a soft cap the undergrowth will again strengthen the building, but the lime mortar used within the walls should prevent the damage seen previously.

After week 2
Conclusion
Although I was initially slightly dubious about putting my office-conditioned soul through hard physical labour I was not asked to do anything beyond my capabilities, and I had a thoroughly enjoyable week with Charlie, Rachel and the team. I learned interesting details about building consolidation which hopefully will be useful during future CHT projects, and I know that next time I am around a historic building I shall be looking critically at the walls and the mortar.